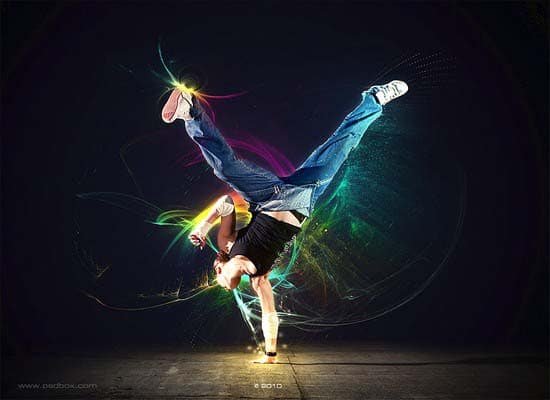
30 Oct Amazing Dancing Effect in Photoshop

Today I want to show you a tutorial about how to create a simple and colorful photo manipulation using only Photoshop. You will learn techniques to colorize your brushes and you can create amazing dancing effects. So let’s have a try…
Resources needed:
- The stock image used on this tutorial is from here
- The brushes that will be used on this tutorial can all be founded on the Light Streak Brushes
Step 1
The first thing you have to do is to extract the dancer from the background image and paste it on a different layer but keep that background image because we need part of the floor. Make sure the dancer’s layer is on top of the layer containing the floor.

Create a layer under the dancer and the floor, this will be the background. Using a radial gradient, choose the Foreground Color #11111f, Background Color #000000 and draw a gradient from the center of the image.

Select the layer with the floor and create a layer mask (Layer>Layer Mask>Reveal All). Use the Gradient Tool (G) to create a radial mask and hide part of the dance floor.

Step 2
Make some color adjustments to the dancer using a Curves Adjustment Layer.

Step 3 – The abstract light shapes
It’s time to add the abstract stuff. Open the Starlight image and put it on a new layer between the dancer and the floor layers. Change its Blending Mode to Lighten.

Step 4
Download the Light streak brushes (or use your own if you want) and pick one that you like and paint with it on a new layer.

You have multiple options of coloring your brushes and it’s up to you and your own taste which one you choose.
For this tutorial, I chose the color gradient technique because it allows you to create more variations in colors.
For this technique, create a Clipping Mask for the layer where you painted with the brush (SHIFT+CTRL+N -> Use Previous Layer to create Clipping Mask) and select the Gradient Tool (G).
Use the Linear or Radial Gradient and on the Gradient Editor change Gradient Type to Noise. Click the Randomize button until you get something you like and draw the gradient.
Apply a 50px Gaussian Blur to the gradient layer in order to get smoother transitions of the colors and set Blending Mode to Pin Light.

To make it brighter, I also added to the light brush layer an Outer Glow of 191 pixels and 33% Range and set the Blending Mode of the glow to Color Dodge.
Add more brushes and use the same coloring technique.

Step 5 – More light
Create a new layer on top of all layers on the palette; select the Brush Tool (B) and a big soft edge brush. Paint 2 dots with a blue sky color on the dancer’s body and a yellow one where the hand touches the ground. Set the Blending Mode to Overlay.

Select the dancer layer and apply an Outer Glow of 65px, Range 79% and Blending Mode – Color Dodge.
You can create the glowing dust rising up from the floor using a soft edge brush and apply Shape Dynamics and Scattering.


Step 6 – Color rain
Make a new layer above the background layer (the one with the gradient, that you made on Step 1), fill it with black and go to Filter>Noise>Add Noise. Set Amount 260%, Uniform and Monochromatic. Apply a Motion Blur filter of 120 pixels and 45º angle.

Open the Levels by pressing CTRL+L and use these settings.

Set Blending Mode to Color Dodge, create a Clipping Mask layer on top of this noise layer and draw a colorful linear gradient. Use the same technique shown in Step 4.

Final Product

You can add more things if you like.
I hope you liked this tutorial and that you learned something new. If you have any suggestion then please post a comment below.
Have fun… 🙂
Credit: psdbox.com

Sorry, the comment form is closed at this time.