10 May Create a Digital Photo Manipulation

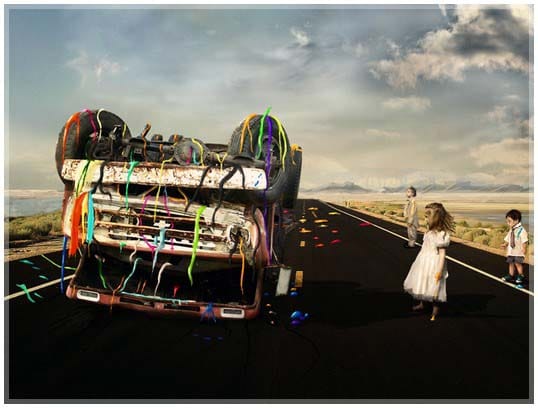
In this tutorial we will describe how to create a digital photo manipulation using photoshop. We use a few simple techniques, and combine a whole heap of images together to make a wonderful creative collage. Let’s get start…
Stock images:


Step 1:
First we will choose the dimension of piece. I have used 1354 x 765 pixels in dimension. Then we will create a concept for work, a basic idea, to start the piece. Then we shall start the piece, and I raised the stock of background.

Step 2:
Now we will add a sky, to improve the environment. I used a cloud stock photo from the resurgere stock package. I then deleted some parts of the sky.

Step 3:
Blending the sky.
I create a layer on the layer of sky, with the blend mode in Color and Opacity 45% and Fill 100%. Then I use up the soft brush and started to paint the parties which were not combining with the stock, I have used the color #889bac.

Step 4:
Now I got a layer with blend mode in normal, and opacity in 37%. I used the color #e5e0c0 and painting on the road to improve the blending. After duplicate the layer and I change the blend mode in Overlay.

Now I have used techniques of paint. First paint a land the background to improve the depth and the environment.
Paint some mountains to the background not remain very empty. I used a brush with the colors of sky, to draw the reflection of water.

Step 6:
I add alongside left piece a light to improve the illumination and the right hand I used a brush dark opacity with low for shade. Well, we will now begin to add some stocks in our piece.
First cut out all of the stocks, using the Pen tool.
After cut I always am Layer > Matting > Defringe. I used a setting of 1 px.
Now I added the stock of the kid, I made a treatment in stock to be equal to the colors of the environment to combine.
I used for the treatment, the options Color Balance, Hue saturation and Brightness/Contrast. (Image > Adjustments > Color Balance, or Hue Saturation or Brightness/Contrast)
To make the shadow of the child, I duplicate the layer of the child and press Ctrl+U (Image > Adjustments > Hue Saturation) and I put the Lightness -100, and resize the shadow side against light. To help to resize press Ctrl+T, click the button right the mouse in selection and go Distort.
Layer of shadow: 40% opacity and 100% fill, but can diversify the environment of the piece. A tip you watch the shadows which are already in stock of the background and try match the shadows that you create.
I also I used Burn/Dodge tool to guess the illumination of stocks.

Step 7:
Repeat Step 6, I have used the same techniques in the other stocks.

Step 8:
The truck :
We now add the stock of truck. I used the same technique of Step 6. In the shadow of truck I used the same technique, but you may delete where not is well positioned shadow.
For the cracks, I have used some simple Photoshop brushes that I found on deviantART. Find some crack brushes, add them in then use opacity of 50-70%.

Step 9:
The paint :
Can now be the most boring the piece, but I like it.
I have used a Wacom Intuos 3 to make this painting, but you can use the Pen tool or even the brush.
You don’t need be in a hurry, do so that it is good, then create shape with Pen tool, or paint you may use the tool Burn/Dodge tool to make a lighting and best in the paint. I used enough burn/dodge tool to remain very real paint.
To make the shadow you may paint, see the hand that the light is focusing and will try and create the shadow so that it is for the right.

Step 10:
Now I duplicate the Background twice. For the first I put the blend mode on Color and opacity of 20% for the second layer I put the blend node on soft light and opacity 20%.
This is to improve the color a little bit.

Step 11:
Now I create a layer put the blend mode in Soft Light and opacity 50%. Then I seize up the Soft brush black in color and have used around the piece, in order to improve the depth and Soft Brush white in some parts.

Step 12:
For a little bit more treatment of colors, go to Layer > New Adjustment Layer > Color Balance, and use these settings:
Midtones: +19 ; -9 ; -12
Shadows: -14 ; 0 ; -3
Highlights: 0 ; 0 ; -5

Now for a gradient map, go to Layer > New Adjustment Layer > Gradient Map and use a black to white gradient, set the layer mode to Luminosity and lower the opacity to around 75%.
Add a photo filter as well, with Deep Yellow preset, use about 16% opacity.
Selective Colors:
Red: -57 ; 0 ; 0 ; 0
Yellows: -23 ; 0 ; -31 ; 0
Blacks: -12 ; +9 ; -11 ; 0

A few more simple visual treatments and we’re done. You have to be creative here, add in as many color adjustment layers as you think is necessary.
Final Result:
Hope you can learn something new from this tutorial.
I feel really glad if you give me feedback through comment below. Soon i am going to show more interesting & innovative tutorials so please keep visit our blog. That’s for now.
Have fun!
Reference: designblurb


Sorry, the comment form is closed at this time.