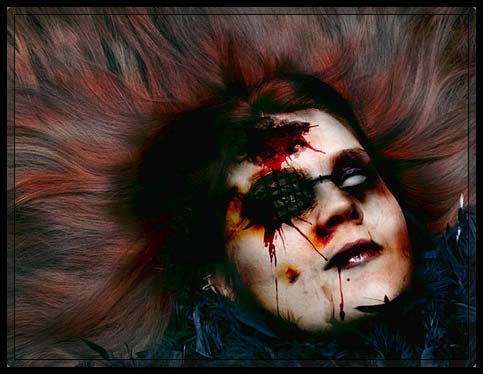
30 Nov Create A Horror Effect using Photoshop

Today we’re going to learn to use various photo manipulation techniques to achieve a horror effect. It’s not really a difficult work but I can guide you through it and show you the basics which I believe you’ll find very helpful. Let’s have a try…
Step 1:
First we need a good stock image. For this tutorial, I’m going to use the image below.

Step 2:
Since we got our stock image, we can begin with our journey.
First of all we’ll need to add some murkiness in various parts of the object, to do that we’ll need to use the burn tool which is one of the basic tools for this kind of photo manipulation.
For example I’ll start with the hair, so grab the burn tool, and change the brush style to soft rounded brush at brush size: 100 pixels. Don’t forget to set the foreground color to default (black) too.

Step 3:
After we’re done with the hair we’re going to work on the face a bit, using the burn tool again. This time reduce the brush size to 45 pixels so we can make more detailed effects and use it mainly on those parts of the object where the shadow falls.

Step 4:
Now that we’re finished with the burn tool, we’ll focus on the eyes a bit more. Here we’re going to remove the pupil from the left eye and stamp the right one with a metal grid. In this case we’re going to use the smudge tool. So get the smudge tool and set the brush size to 17 pixels, and simply drag from the whiteness around the pupil and into the pupil part of the eye. Repeat this step several times until you reach the effect.

Step 5:
As we already mentioned, we’ll use a metal grid to stamp the right eye. For this kind of technique essentially we’ll need a texture with a metal grid. So we’ll use this texture right here.

When we have our texture, just copy one of the squared metal grids in the center and paste it to the image where we’re working on. After we’ve done that, rotate the layer a bit left so it can fit up strictly over the eye. Now add a layer mask and grab the brush tool, set the brush size to 35 pixels and use it to shape the layer into an eye. For the end change the blending mode of the layer to overlay and simply duplicate the layer for a more accented effect.

Step 6:
After the metal grid has been applied to the other eye, it’s time to add some scars, mainly on the left part of the object including the rounded parts of the right eye.

Copy, paste the texture over the image and rotate it a bit right so the basic central line to lie down on the right arcade of the object. After that, change the blending mode of the layer to color burn and duplicate the layer.

It wouldn’t be true horror effect if we didn’t create some bleeding holes. Let’s proceed.
Step 7:

Copy and paste the above texture, use the layer mask and brushes as we used in the upper steps, but now set the blending mode to linear burn.

Step 8:
Grab the blood brushes and splash some blood all over the hole, set the blending mode to color burn.

Step 9:
Now we need to darken the object a bit to reach some color balance. To do that we’re going to use yet another texture.

Do the same things we did with the previous textures, just don’t let the texture to have any kind of influence on the mouth and the eyes or to appear outside the border of the main object.

Step 10:
Let’s pay some attention to the mouth now that we’ve already mentioned it, so grab the blood brush once again and add a bleeding on the mouth with the color burn blending mode.

For the end we’re going to sew up the upper part of the nose using some scar brushes and after that we’ll set the blending mode to linear burn and duplicate the layer.

Final Product:
That’s it. I’ve just made some changes to the color and general tones in the image below, feel free to experiment with the adjustment filters as well.

I hope you enjoyed the tutorial & find it useful. For upcoming & awesome tutorials please keep visit our blog.
If you have anything to share, please drop your comment below. Have a nice day.
Credit: graphisutra.com

Hermitbiker
Posted at 01:49h, 01 December…. fantastic !!
El
Posted at 22:10h, 01 DecemberGreat photo manipulation
web
Posted at 09:45h, 03 DecemberA really well depicted photoshop tutorial with appropriate step by step procedure!!..
Pingback:50+ Photoshop Tutorials with Most Scary Terrible Horror and Zombie Photo Manipulation Effects | CrispyLogs
Posted at 21:44h, 12 August[…] 3. Create A Horror Effect using Photoshop […]
Pingback:5 tutoriales Photoshop para hacer efectos de terror
Posted at 16:42h, 25 October[…] Efecto de horror con Photoshop. Este es un tutorial que consta de 10 pasos, a través de los cuales aprenderemos como crear un efecto de terror en un rostro. Se utilizan varias texturas, además de que se emplean diferentes modos de color. Al final se obtiene un resultado bastante decente. […]
Pingback:35 Popular Halloween Photoshop TutorialsPhotoshop Website - Tutorials,Brushes & more..
Posted at 10:46h, 30 October[…] Create A Horror Effect using Photoshop […]