02 Dec Design A Old Style Photo Effect using Photoshop

Today I am going to show you a useful tutorial. In this tutorial you can learn how to create old style photo effect with interesting accent. So let’s have a try…
At first you need to find some appropriate picture for our tutorial. Actually you can find pictures in Google search or use this picture. Open our original picture and apply Image > Adjustments > Hue/Saturation with next presets to change hue and saturation:

See the difference now:

Duplicate this layer with Ctrl+J and apply Filter > Blur > Gaussian Blur with similar settings to these:

After that mess with the layer mode & opacity/fill. I tried multiply with a fill of 60%.

Now use Image > Adjustments > Levels with next presets to make the color correction:

See the result below:

Ok, now I would like to add the dark areas along the picture edges to create focus for the future accent. To do this create a new layer and fill it with black color. Then select the Eraser Tool (Opacity: 50%) and a soft round brush about 300 px and clear the inner area as shown on my picture:

Set layer opacity to 70% up:

Okay, we are done with background. Now it’s time to add an accent to our picture. I got it from another picture. You can find it using Google search or use this one. Open this file, then select the Polygonal Lasso Tool and select the boy’s body as on picture below:

Use Ctrl+C to copy selected part of image from this photo and paste copied fragment to the main document. Then use Ctrl+T to miniaturize this fragment a little bit and move it down as shown on my picture:

Tweak contrast of the fragment using Image > Adjustments > Brightness/Contrast with with similar settings to these:

See the difference:

Okay, now time to add some shadow under the boy. Go to the layer under the boy and create a new layer. Then select the Brush Tool and a soft round brush about 15 px and draw black spot as below:

Now it’s time to add bigger shadow from boy’s body. Create a new one layer, then select the Brush Tool with the same parameters and create bigger spot on the floor as on my picture:

I think it will be better to make this shadow a little bit sparse in the end. For this effect select the Eraser Tool (Opacity: 30%) and a soft round brush about 45 px and make a couple of clear strokes. Now shadow looks better, isn’t it?

To finish off the tutorial I think we need to do a little burn work with the boy’s picture.
Now, using the Dodge Tool with moderate settings (Brush: 250 px, Range: Shadows, Exposure: 25%) do a little bit of dodge-work on this layer.

Now duplicate this layer with Ctrl+J and apply Filter > Blur > Gaussian Blur with next presets:

After that change layer mode to Soft Light and set opacity up to 65%.

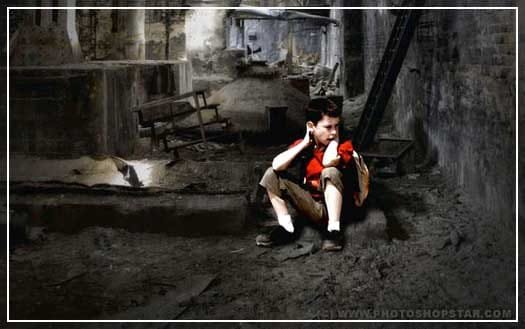
Final Result

We are done for now. Looks good as for me! Use it, make it and enjoy your own nice photo effects!
Hope you like this tutorial and find it useful.
I feel really auspicious if you give me feedback through comment below. Soon i am going to show more interesting tutorials. That’s for now.
Thank you… 🙂
Credit: photoshopstar.com

ashish
Posted at 03:34h, 09 Juneplease send me ur programe yahoo.mail