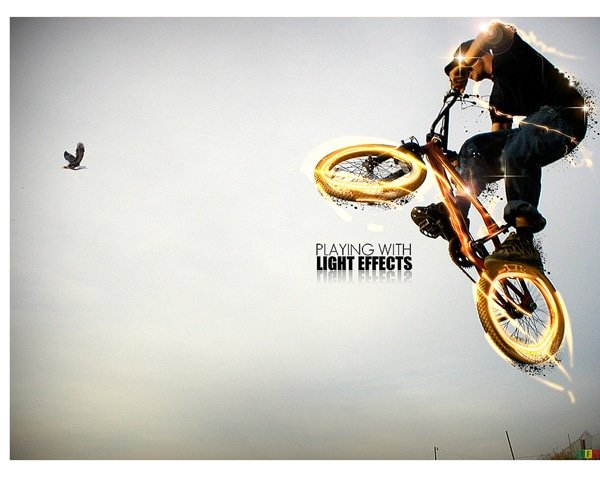
22 Sep Light Effects techniques in Photoshop

By using Photoshop tutorial I can make a biker a stylish and awesome view with light effect. So I offer you to learn a light effect techniques in Photoshop. In this tutorial you will learn how easily using Adobe Photoshop you can create such a biker light effect. In tutorial all steps are described in details, so I think you will have no difficulty learning this effect.
1.Step
Create a new layer with 1260×1024 size and name this layer back ground. Open your image. Press Ctrl + A to select the image, Ctrl + C to copy the image, then return to your original document and press Ctrl + V to paste the image, name this layer biker. Re-size the image if necessary Atrl+T.


2.Step
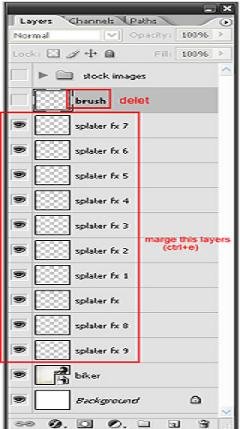
Now we’ll create the displace effect using the brush tool. Download the Splatter brushes. Create a new layer, go to Layer > New Layer and name this layer “brush”. This layer will be deleted later. Now I’ll show how to create this Splatter or displace effect. I´ll choose the tire to start. Then you just repeat the same process in other areas of the image. Choose your brush package that was loaded (press B) and paint over any area of the tire (follow the image below as reference), then go to Select > Load selection. Now turn off the visibility of brush layer and go to our biker layer, then with selection active press Ctrl+C to copy and Ctrl+V to paste into a new layer. Now use move tool (press V) to drag a little bit our splatter effects or use arrows keys. Now what you should do is repeat the same process in other parts. Name this layer “splatter fx”. Repeat as many times as you want then merge all splatter effects layers together (ctrl+e) OK.

3.Step
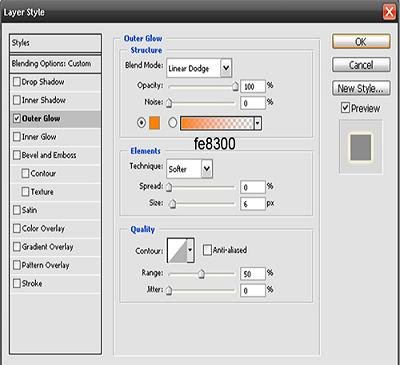
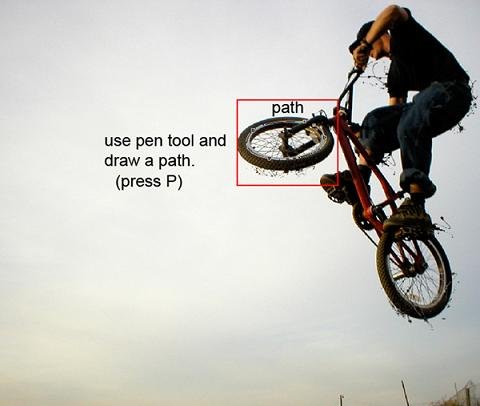
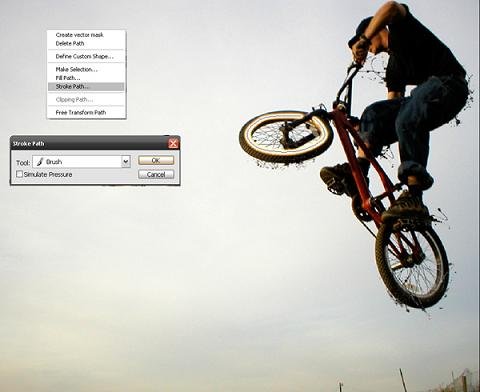
After merge all “splatter fx” layers together, it is time to create our light effects. Create a new layer and name front tire effect, then, select the pen tool (press p) and draw a line around the tire. Follow the image bellow as reference. Then (press B) for brush tool, choose a standard soft round brush with 13px, right click in your mouse select stroke path and hit OK to create our line. Let´s add some layer style, go to Layer > Layer style >Outer glow and follow this settings, blend mode: linear dodge, opacity 100%, size 6px and color fe8300, do not change the other settings. Follow image bellow as reference-
4.Step
Now copy front tire fx layer and rename front tire motion. Go to Filter > Blur > Motion blur, angle -42 and distance 50, hit OK. Change blend mode to Overlay.

5.Step
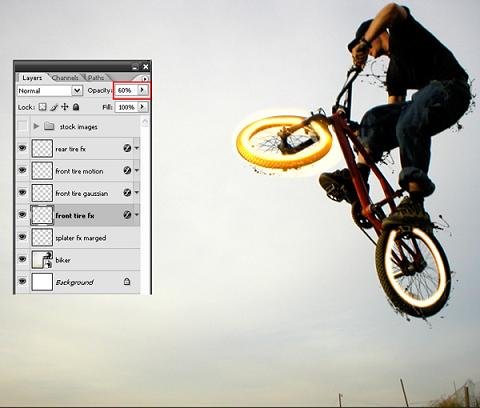
Return to your front tire effect layer and copy again Ctrl+J, rename front tire Gaussian. Go to Filter > Blur > Gaussian blur, radius 9px and hit OK. Change blend mode to overlay. Finally, all you need to do is repeat the same process on the rear tire OK. When you finally finish with front tire Gaussian and front tire motion layers return to you front tire effect layer and reduce the opacity to 60%.

6.Step
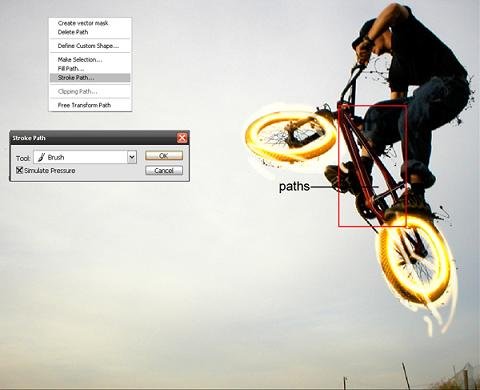
Create a new layer and name lines effects. Choose pen tool (press P) and create some paths like image bellow. Then right click in your mouse, choose stroke path and hit OK. Then you can use the same layers style of step 3 in you lines effects layer.

7.Step
Copy layer line effects and rename line effects motion. Go to Filter > Blur > Motion blur, angle-42 and distance 50 hit OK.

8.Step
Create a new layer and name bike lines, make a few more lines on the bike, but this time use a smaller brush with 2 or 3 px. Use pen tool to create the paths (press P) then right click in your mouse choose stroke path with simulate pressure active, hit OK. One more time I can use the same layer style of step 3.
9.Step
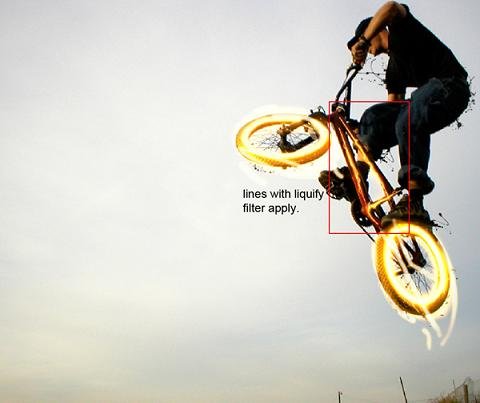
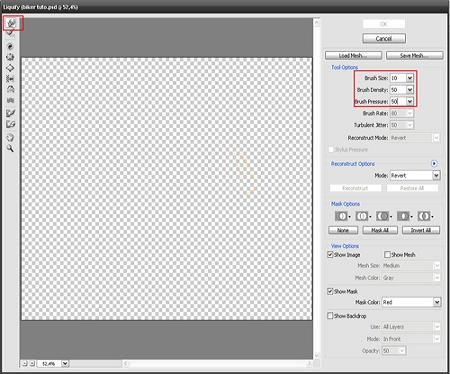
Copy the bike lines layer Ctrl+J and rename bike lines distort. Go to Filter > Liquefy. Choose forward Warp tool, brush size 10px, brush density 50 and brush pressure 50. Then start to distort the lines. When you are satisfied with the result hit OK.
10.Step
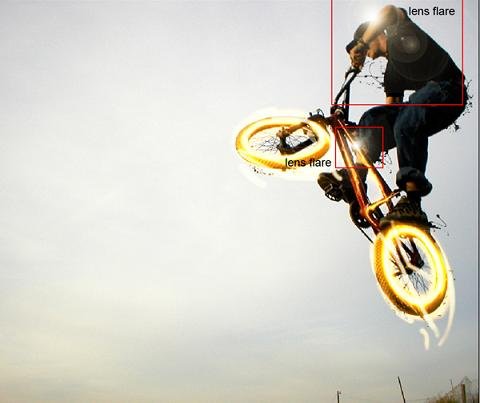
Now let’s put the more lights. Create a new layer and name shine. Select Rectangular Marquee tool ( press M) and make a square like image bellow. Fill the square with black color, go to Edit > Fill. Then go to Filter > Render > Lens flare. Brightness 100% and lens type 50-300mm zoom, hit OK. Now change the blend mode to screen and drag it over the biker shoulder. Copy the shine layer and replace in other parts.

11.Step
Lets create something like a star. Create a new layer and name star, choose brush tool (press B), with a hard round brush 100px paint anywhere on the image. Then press Ctrl+T to re-size. Follow the images bellow as reference, hit enter when you finish, now copy this layer Ctrl+J and Ctrl+T, right click, choose rotate 90cw and marge these two layers together Ctrl+E. When you finish re-size Ctrl+T and put the star over some areas in your image to create more effects.


12.Step
This is the easiest step. Create a new layer and name withe balls. Now choose a soft round brush (press B), with 20 px and start paint around the biker body. Use different sizes of brushes. Follow the image as reference again.

Note: if you want you can group all the light effects layers together when you finish. I’ll stop here, but you can add more effects on the biker body if you wish. I hope you enjoyed this tutorial.
If you have any questions or suggestions please contact with us at Clipping Path Service Provider’s Blog . Thank you.
Result: Bicker with Light Effects
 credit:- psdeluxe.com

Sorry, the comment form is closed at this time.