
10 Oct Splashing Water Text Effect Using Photoshop

In this tutorial, I will show you the steps I took to Create Awesome Splashing Water Text Effect in Photoshop. Along the way, you will learn how you can incorporate water splash brushsets into your text and create great effect from that. Have a try!
OK let’s get started!
To complete this tutorial, you will need the following stocks:
Water Splashing Brush
Lake
Step 1
Create a new document sized 940px * 700px, fill the background layer with black. Load the Lake stock image into Photoshop, use the Lasso Tool with a 40px feather setting, draw a selection of the lake portion:

Copy and paste the selection on to our canvas, use a big soft brush to erase its edges, and reduce its layer opacity to around 60%. The effect is as shown below:

Duplicate the water layer twice, move the duplicated layer to the left and right of the original water layer, as shown below: (set the layer opacity to slightly lower than the original water layer to create depth)

Duplicate the original water layer once more, resize it to a smaller piece and position it to the center, then increase the layer opacity to 100%:

Add the following two adjustment layers on top of all layers created so far:
Curves

Levels

and you will have the following effect so far: (centre portion highlighted, and that will be the text will be placed)

Step 2
Now use any font you like, type a single letter on the canvas as shown below:

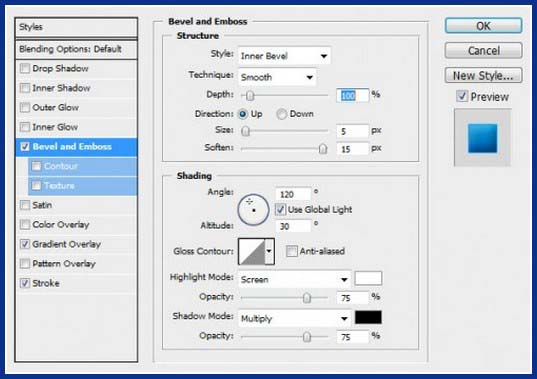
Apply the following layer blending options to this text layer:
Bevel and Emboss
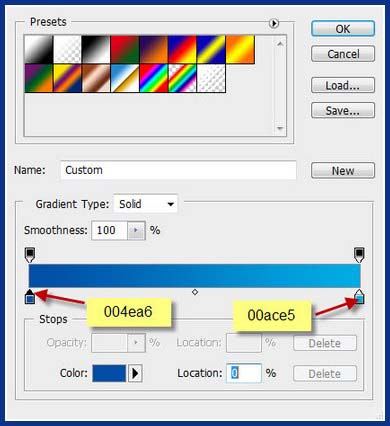
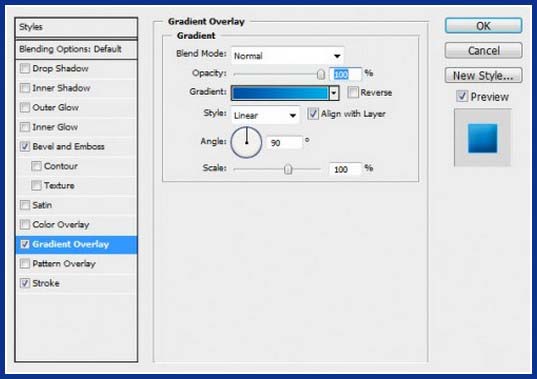
Gradient Overlay:
Stroke

and here is the effect so far:

Step 3
Now let’s add some noise to the text and get ready for the water splashing effect later on. Create a new layer on top of the text called “noise”, load the selection of the text layer and fill the selection with black colour, go to Filter > Noise > Add Noise and apply the following setting:

The effect after you apply the noise filter:

Change the blending mode of thie noise layer to “screen”, drop the layer opacity to around 35%, you will have the following effect:

Create a new layer on top of the noise layer, name it “light and shadow”, use a combination of black and white brush, paint it as shown below:

Change the blending mode of this light and shadow layer to “Overlay” – as you can see, this add some lighting contrast to the text:

Step 4
Now we can paint some water splashing effect around text. Create a new layer called “water splash” and load the water splash brushes into Photoshop, choose some brushes from the set and paint around the text, as shown below:

Make sure when you paint the water splashing effect, use a combination of big and small sized brushsets, also adjust the flow and opacity of the brush, DO NOT just use one setting for the whole thing:

Keep adding more water splashing around the text – to be more creative, paint some water streams dropping from the edges of the text:

For the water streams, I used a 6px, soft white brush to paint in addition to the water splashing brush, as shown below:

Use the same technique to paint the water stream on the left:

You can use a small, soft white brush to draw around the edge of the text to create some waterflow/highlight effect:

Highlight effect for the text edges:

here is the effect you will be aiming to achieve so far:

Step 5
Now we will make the water splash around the text sharpen a bit. To do this, duplicate the water splash layer you’re painting on once (if you have searval layers for the water splash, group them first, then right-click on the group and choose “merge group” option).
Apply the following Smart Sharpen filter setting to the duplicated layer:

and you can see the water splash sharpened and become more visible:

Now create a new layer called “shadow” under the original text layer, grab a black soft brush and paint some shadow on the water and under the text, as shown below:

Optionally, you can add more water splashing effect around the text:

To make the text effect more dramatic, you can add some misty effect by create a new layer named “mist” just above the background layer, use a Lasso Tool with 50px feather, draw a selection around the text as shown below:

Render some cloud inside the selection, drop the layer opacity of this mist layer to around 50%, and you will have the following misty effect:

Step 6
Now we’re into the final stage of this tutorial. I feel like adding some highlights around the text, so as to make the certain parts stand out. To do this, create a new light on top of all previus layers, use a small white soft brush to paint (single-click) to the points shown below:

Now you can also use the Distrot option (available when you press Ctrl + T, then right-click) to adjust the shape of the light, to fit the angel of the latter:

I added one Color Balance image adjustment layer just to add a bit more light blue colour into the image:

Layer Mask on the Color Balance adjustment layer:

and you will have the following final effect:

Reference: 10steps.sg

avery
Posted at 07:51h, 15 JulyHowdy! I simply would like to give a huge thumbs
up for the nice information you might have here on this
post. I shall be coming back to your weblog for more soon.